
 性能优化之虚拟列表
在遇到大量数据(成千上万)列表渲染的时候,由于 dom 元素创建和渲染开销很大,导致页面卡顿。这种情况下社区提出了“虚拟列表”的解决方案,类似于懒加载,即只在可见区域 进行渲染,而不必一开始就全部挂载,这样可以达到极高的初次渲染性能。
# 问题
假设初始化渲染 1w 条数据,我们使用 vue3+element-plus 的 select 组件来渲染,计算列表数据从初始化到挂载到页面上的耗时。
| 数量量/条 | 100 | 1k | 10k | 50k |
|---|---|---|---|---|
| 耗时/ms | 22 | 164 | 2186 | 9372 |
可以看到,当数据量超过 1 万条后,dom 挂载出现不可接受的卡顿,这种场景虽然少见,但仍可能出现,比如一次性显示所有的门店或仓库。
接下来,应用 element-plus 的 select-v2 组件来渲染,其耗时如下:
| 数量量/条 | 100 | 1k | 10k | 50k |
|---|---|---|---|---|
| 耗时/ms | 9 | 14 | 17 | 58 |
demo 地址见github (opens new window),操作步骤为
pnpm i,pnpm dev。
由此,可以看出虚拟列表的性能优势。
# 节点调试
以渲染 1 万条数据为例,组件渲染后,我们将其分为 3 个部分:可视区,可滚动区和列表项。如下图:
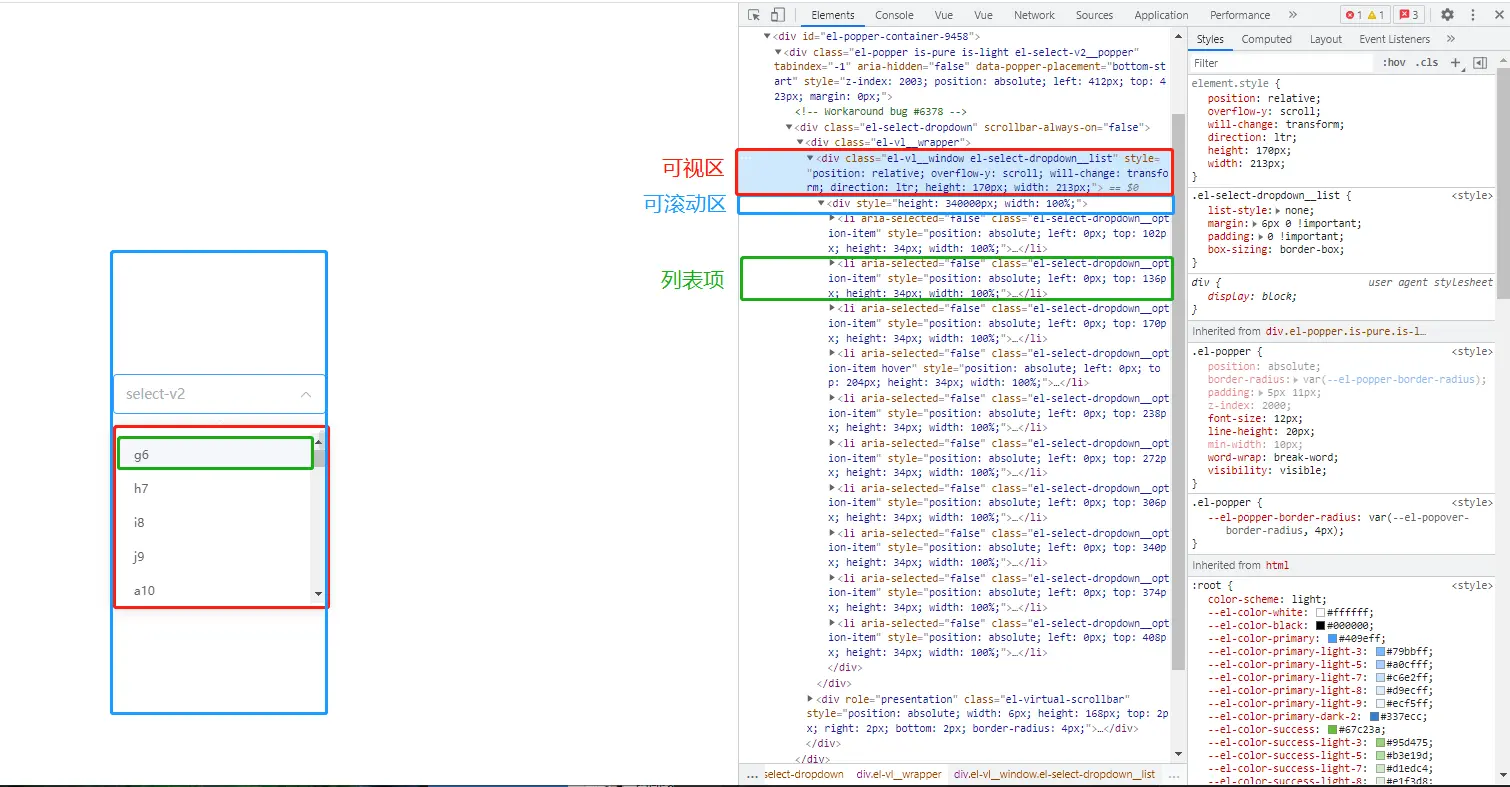
可视区:select-v2 的选择框默认高度为 170px,即为可视区的高度,内部内容可以在可视区进行滚动。其行内样式为:
position: relative;
overflow-y: scroll;
will-change: transform;
direction: ltr;
height: 170px;
width: 213px;
1
2
3
4
5
6可滚动区:是一个占位的可滚动区域,对于列表项高度固定的场景,可滚动区的高度=数据条数*列表项的高度。样式为:
height: 340000px;
width: 100%;
1
2列表项:从全部数据中截取的部分数据,用于渲染在可视区的列表项。随着滚动区的滚动,列表项的内容也随之变化。每个列表样式如下(top 值不同):
position: absolute;
left: 0px;
top: 442px;
height: 34px;
width: 100%;
1
2
3
4
5
# 主要源码
基于上面的认知,开始从源码上寻求验证。
找到 select-v2 入口
组件入口在
packages\components\select-v2\index.ts,注册为全局组件,并以插件的形式供外部使用。import Select from './src/select.vue' Select.install = (app: App): void => { app.component(Select.name, Select) } export default Select1
2
3
4
5select 组件
查看
select.vue,其主要结构如下:<div> <el-tooltip> <template #default></template> <template #content> <el-select-menu></el-select-menu> </template> </el-tooltip> </div>1
2
3
4
5
6
7
8// 选择框组件 import ElSelectMenu from './select-dropdown' // hook import useSelect from './useSelect'1
2
3
4由此,我们查看
select-dropdown.tsx。select-dropdown 组件
在 setup 中,主要代码如下:
import { DynamicSizeList, FixedSizeList } from '@element-plus/components/virtual-list'
import OptionItem from './option-item.vue'

export default defineComponent({
  setup(props, { slots, expose }) {
    const Item = (itemProps: ItemProps<any>) => {
      const { index, data, style } = itemProps
      const sized = unref(isSized)
      const { itemSize, estimatedSize } = unref(listProps)
      const { modelValue } = select.props
      const { onSelect, onHover } = select
      const item = data[index]
      return (
        <OptionItem
          {...itemProps}
          selected={isSelected}
          disabled={item.disabled || isDisabled}
          created={!!item.created}
          hovering={isHovering}
          item={item}
          onSelect={onSelect}
          onHover={onHover}>
          {{
            default: (props: OptionItemProps) => slots.default?.(props) || <span>{item.label}</span>,
          }}
        </OptionItem>
      )
    }

    const List = unref(isSized) ? FixedSizeList : DynamicSizeList

    return (
      <div class={[ns.b('dropdown'), ns.is('multiple', multiple)]}>
        <List
          ref={listRef}
          {...unref(listProps)}
          className={ns.be('dropdown', 'list')}
          scrollbarAlwaysOn={scrollbarAlwaysOn}
          data={data}
          height={height}
          width={width}
          total={data.length}
          onKeydown={onKeydown}>
          {{
            default: (props: ItemProps<any>) => <Item {...props} />,
          }}
        </List>
      </div>
    )
  },
})
1
2
3
4
5
6
7
8
9
10
11
12
13
14
15
16
17
18
19
20
21
22
23
24
25
26
27
28
29
30
31
32
33
34
35
36
37
38
39
40
41
42
43
44
45
46
47
48
49
50
51这段代码中,List 就是虚拟列表组件了,默认情况下列表项高度是固定的,使用的是 FixedSizeList 组件;Item 就是列表项,实际是 OptionItem 组件,渲染了 label 属性, 并接收传入的 style 作为行内样式。
FixedSizeList 组件
FixedSizeList 组件位于
packages\components\virtual-list\src\components\fixed-size-list.ts,element-plus 新增的几个虚拟列表相关的组件如 el-select-v2、el-tree-v2 等都使用了虚拟列表组件。import buildList from '../builders/build-list' const FixedSizeList = buildList({ name: 'ElFixedSizeList', // ... }) export default FixedSizeList1
2
3
4
5
6
7FixedSizeList 是使用 buildList 函数生成的组件,它包含虚拟列表的核心代码。
build-list.ts
const createList = ({
  name,
  getOffset,
  getItemSize,
  getItemOffset,
  getEstimatedTotalSize,
  getStartIndexForOffset,
  getStopIndexForStartIndex,
  initCache,
  clearCache,
  validateProps,
}: ListConstructorProps<VirtualizedListProps>) => {
  return defineComponent({
    setup(props, { emit, expose }) {},
    render(ctx: any) {},
  })
}
export default createList
1
2
3
4
5
6
7
8
9
10
11
12
13
14
15
16
17
18从两部分来解析,
setup和render。5.1 setup 主要完成几个属性的计算和 scroll 事件的处理
states
const states = ref({
  isScrolling: false, // 是否正在滚动
  scrollDir: 'forward', // 滚动方向 forward-向前 backward-向后
  scrollOffset: isNumber(props.initScrollOffset) ? props.initScrollOffset : 0, // 滚动偏移量
  updateRequested: false,
  isScrollbarDragging: false,
  scrollbarAlwaysOn: props.scrollbarAlwaysOn,
})
1
2
3
4
5
6
7
8itemsToRender
const itemsToRender = computed(() => {
  // total:全部数据条数 cache:前后缓冲数据条数,防止滑动过程中出现空白
  const { total, cache } = props
  const { isScrolling, scrollDir, scrollOffset } = unref(states)

  if (total === 0) {
    return [0, 0, 0, 0]
  }

  // 可视区的第一条数据的索引
  const startIndex = getStartIndexForOffset(props, scrollOffset, unref(dynamicSizeCache))
  // 可视区的最后一条数据的索引
  const stopIndex = getStopIndexForStartIndex(props, startIndex, scrollOffset, unref(dynamicSizeCache))

  const cacheBackward = !isScrolling || scrollDir === BACKWARD ? Math.max(1, cache) : 1
  const cacheForward = !isScrolling || scrollDir === FORWARD ? Math.max(1, cache) : 1

  // 前2个是主要索引,分别表示列表项的第一条和最后一条数据的索引
  return [Math.max(0, startIndex - cacheBackward), Math.max(0, Math.min(total! - 1, stopIndex + cacheForward)), startIndex, stopIndex]
})
1
2
3
4
5
6
7
8
9
10
11
12
13
14
15
16
17
18
19
20getStartIndexForOffset和getStopIndexForStartIndex方法如下:// offset / itemSize,即滚动区偏移量/列表项高度 const getStartIndexForOffset = ({ total, itemSize }, offset) => Math.max(0, Math.min(total - 1, Math.floor(offset / (itemSize as number)))) // startIndex + numVisibleItems,即可视区的第一条数据的索引加上可视区内的数据条数 // numVisibleItems = height/itemSize const getStopIndexForStartIndex = ({ height, total, itemSize, layout, width }: Props, startIndex: number, scrollOffset: number) => { const offset = startIndex * (itemSize as number) const size = isHorizontal(layout) ? width : height const numVisibleItems = Math.ceil(((size as number) + scrollOffset - offset) / (itemSize as number)) return Math.max( 0, Math.min( total - 1, // because startIndex is inclusive, so in order to prevent array outbound indexing // we need to - 1 to prevent outbound behavior startIndex + numVisibleItems - 1 ) ) }1
2
3
4
5
6
7
8
9
10
11
12
13
14
15
16
17
18
19windowStyle
const windowStyle = computed(() => [
  {
    position: 'relative',
    [`overflow-${_isHorizontal.value ? 'x' : 'y'}`]: 'scroll',
    WebkitOverflowScrolling: 'touch',
    willChange: 'transform',
  },
  {
    direction: props.direction,
    height: isNumber(props.height) ? `${props.height}px` : props.height,
    width: isNumber(props.width) ? `${props.width}px` : props.width,
  },
  props.style,
])
1
2
3
4
5
6
7
8
9
10
11
12
13
14即可视区的样式,这里 height 默认为 170
innerStyle
const innerStyle = computed(() => {
  const size = unref(estimatedTotalSize)
  const horizontal = unref(_isHorizontal)
  return {
    height: horizontal ? '100%' : `${size}px`,
    pointerEvents: unref(states).isScrolling ? 'none' : undefined,
    width: horizontal ? `${size}px` : '100%',
  }
})
1
2
3
4
5
6
7
8
9即可滚动区的样式,主要是计算高度。可滚动区的高度=数据条数*列表项的高度。
const estimatedTotalSize = computed(() => getEstimatedTotalSize(props, unref(dynamicSizeCache)))

const getEstimatedTotalSize = ({ total, itemSize }) => (itemSize as number) * total
1
2
3onScroll
const onScroll = (e: Event) => {
  unref(_isHorizontal) ? scrollHorizontally(e) : scrollVertically(e)
  emitEvents()
}
const scrollVertically = (e: Event) => {
  const { clientHeight, scrollHeight, scrollTop } = e.currentTarget as HTMLElement
  const _states = unref(states)
  if (_states.scrollOffset === scrollTop) {
    return
  }

  const scrollOffset = Math.max(0, Math.min(scrollTop, scrollHeight - clientHeight))

  states.value = {
    ..._states,
    isScrolling: true,
    scrollDir: getScrollDir(_states.scrollOffset, scrollOffset),
    scrollOffset,
    updateRequested: false,
  }

  nextTick(resetIsScrolling)
}
1
2
3
4
5
6
7
8
9
10
11
12
13
14
15
16
17
18
19
20
21
22
23监听可视区的 scroll 事件,将可滚动区域滚动的距离(scrollTop)更新给偏移量(scrollOffset)。
5.2 render 则通过已计算好的数据,实时更新视图
const {
  $slots,
  className,
  clientSize,
  containerElement,
  data,
  getItemStyle,
  innerElement,
  itemsToRender,
  innerStyle,
  layout,
  total,
  onScroll,
  onScrollbarScroll,
  onWheel,
  states,
  useIsScrolling,
  windowStyle,
  ns,
} = ctx

const [start, end] = itemsToRender

const Container = resolveDynamicComponent(containerElement)
const Inner = resolveDynamicComponent(innerElement)

const children = [] as VNodeChild[]

if (total > 0) {
  for (let i = start; i <= end; i++) {
    children.push(
      ($slots.default as Slot)?.({
        data,
        key: i,
        index: i,
        isScrolling: useIsScrolling ? states.isScrolling : undefined,
        style: getItemStyle(i),
      })
    )
  }
}
1
2
3
4
5
6
7
8
9
10
11
12
13
14
15
16
17
18
19
20
21
22
23
24
25
26
27
28
29
30
31
32
33
34
35
36
37
38
39
40
41这里 getItemStyle 方法定义在 setup 中,如下:
const getItemStyle = (idx: number) => {
  const { direction, itemSize, layout } = props

  const itemStyleCache = getItemStyleCache.value(clearCache && itemSize, clearCache && layout, clearCache && direction)

  let style: CSSProperties
  if (hasOwn(itemStyleCache, String(idx))) {
    style = itemStyleCache[idx]
  } else {
    const offset = getItemOffset(props, idx, unref(dynamicSizeCache))
    const size = getItemSize(props, idx, unref(dynamicSizeCache))
    const horizontal = unref(_isHorizontal)

    const isRtl = direction === RTL
    const offsetHorizontal = horizontal ? offset : 0
    itemStyleCache[idx] = style = {
      position: 'absolute',
      left: isRtl ? undefined : `${offsetHorizontal}px`,
      right: isRtl ? `${offsetHorizontal}px` : undefined,
      top: !horizontal ? `${offset}px` : 0,
      height: !horizontal ? `${size}px` : '100%',
      width: horizontal ? `${size}px` : '100%',
    }
  }

  return style
}
1
2
3
4
5
6
7
8
9
10
11
12
13
14
15
16
17
18
19
20
21
22
23
24
25
26
27其中,列表项样式的 top 值计算如下:
const getItemOffset = ({ itemSize }, index) => index * (itemSize as number)1如此,所有列表项所需的属性已计算完毕。接下来创建 vnodes,将数据更新到视图。
const InnerNode = [
  h(
    Inner as VNode, // div
    {
      style: innerStyle,
      ref: 'innerRef',
    },
    !isString(Inner)
      ? {
          default: () => children,
        }
      : children
  ),
]

const scrollbar = h(Scrollbar, {
  ref: 'scrollbarRef',
  clientSize,
  layout,
  onScroll: onScrollbarScroll,
  ratio: (clientSize * 100) / this.estimatedTotalSize,
  scrollFrom: states.scrollOffset / (this.estimatedTotalSize - clientSize),
  total,
})

const listContainer = h(
  Container as VNode, // div
  {
    class: [ns.e('window'), className],
    style: windowStyle,
    onScroll,
    onWheel,
    ref: 'windowRef',
    key: 0,
  },
  !isString(Container) ? { default: () => [InnerNode] } : [InnerNode]
)

return h(
  'div',
  {
    key: 0,
    class: [ns.e('wrapper'), states.scrollbarAlwaysOn ? 'always-on' : ''],
  },
  [listContainer, scrollbar]
)
1
2
3
4
5
6
7
8
9
10
11
12
13
14
15
16
17
18
19
20
21
22
23
24
25
26
27
28
29
30
31
32
33
34
35
36
37
38
39
40
41
42
43
44
45
46
# 总结原理
源码到此分析完了,简单总结下:

1. 容器结构从上到下依次为可视区、可滚动区和列表项,列表项高度固定,绝对定位。用户看到的内容是可视区中的列表项,它只渲染用户可见的一部分数据。
2. 根据数据条数和列表项高度得到可滚动区高度。
3. 监听可视区的 scroll 事件,根据偏移量分别计算列表项起始和结束数据的索引
4. 索引更新后,列表项内容重新计算。从数据列表中取出索引对应的数据,列表项的样式(top)和内容随之发生变化,重新渲染视图。